Friday 21 December 2007

Bind-it-all Calendar - December


Phew! And now it's done! :o)

This is a fat page sized version of a tag I'd made a while back. Background is scattered straw distress ink applied with a baby wipe and edged with faded burlap. The holly was stamped in pine needles then painted with a water brush. The berries were painted with fired brick ink, which was also used to stamp the "noel" text. Finally a little glossy accents was applied to give the berries a bit of shine.

The quote reads "I heard a bird singing in the dark of December - Oliver Herford "I Heard a Bird Sing".

Thanks to everyone that's stuck with me and looked at each month as I've gone along. I hope you liked it. It was fun to make, though a lot of work!

Nothing (yet) to follow tomorrow :o)

Thursday 20 December 2007

Bind-it-all Calendar - November

November, and a page made with my own stamps that I had made. The birds in flight are one stamp (stamped 1/2 off the page on the left and right sides) and the birds on the ground are another stamp.

The background was created using Tim Holtz's embossing powder/flicking technique from the Christmas tags series on his blog. There's not much else to say about this one, except that I think the stamps have given a really clear impression, and I'm pleased with them! :)

Quote reads "How sad would be November if we had no knowledge of the spring! - Edwin Way Teale"

December tomorrow!

Wednesday 19 December 2007

Bind-it-all Calendar - October


It's October, so it must be halloween! Dried marigold distress ink background, overstamped with Tim Holtz's worn wallpaper stamp in black. Blood drips (a stamp of my own design, actually paint drips, but it works for this too!) stamped in fired brick distress ink.

Distressed slide mount outline was stamped onto white card that had been coloured with shabby shutters distress ink, applied with a baby wipe. Witch was stamped in black onto white card, coloured with green ink and a water brush, trimmed and fixed to the back of the slide mount. Slide mount was fixed to the background using silver snaps.

All that remained was to stamp the text in black and distress the edges of the design with black ink.

Quote reads "October is crisp days and cool nights, a time to curl up around the dancing flames and sink into a good book. - John Siner"

November to follow tomorrow!


Tuesday 18 December 2007

Bind-it-all Calendar - September


The start of Autumn, and the start of autumnal colours in my calendar. I started with a blank fat page, and coloured the top area with faded burlap distress ink. I stamped a row of bulldog clips across the top, then stamped them 1/2 on the edge of a piece of Basic Grey patterened paper, and stuck it to the background.
The woman's face was stamped 3 times, once in faded burlap to echo the background, once in black soot and once in fired brick. Elements of the 3 images were cut out and assembled. It was fixed onto the BG paper and stamped with a paper clips stamp.
"Begin where you are" was stamped in fired brick on white card which had been distressed with faded burlap ink applied with a baby wipe, and a black thumbprint. It was fixed into place and trimmed to fit. Finally, the whole thing was edged in black soot, applied with a baby wipe.
The quote reads: "September: it was the most beautiful of words, he'd always felt - Alexander Theroux".
October to follow tomorrow! :o)

Monday 17 December 2007

Bind-it-all Calendar - August

August, and another strong stamped image that stands up on it's own without too much tinkering. I love this stamp, it reminds me of summers as a kid, when they seemed to go on forever and every day would be hotter than the one before. I remember getting cheap versions of these shoes from Woolworths and wearing them all summer long. In fact, I still wear them most days! (Though not the same pair, obviously).

Image was stamped twice using black soot distress ink on white card. One image was coloured with dried marigold distress ink applied with a baby wipe. The shoes were cut out from the 2nd image and stuck onto the first. End of story, simple but effective.

Quote reads "August creates as she slumbers, replete and satisfied. - Joseph Wood Krutch"

September to follow tomorrow.

Sunday 16 December 2007

Bind-it-all Calendar - July


Probably the most straightforward image in the calendar. The background was antique linen and old paper distress pads, applied direct to paper, then spritzed with water drops and left to dry. The sand dunes image was then stamped in black soot distress ink. Simple, but effective! To finish it off, the edges were sanded until they became slightly frayed.

The quote reads "The glory of July is the glory of an English summer - Anon".

August to follow tomorrow! :o)

Saturday 15 December 2007

Bind-it-all Calendar - June


A relatively simple approach this time. I think the stamped image is so strong that I wanted it to speak for itself. I took two sheets of glossy photo paper and applied alcohol inks to one sheet. I then stamped the image on both sheets, using black Stazon ink.

Using a baby wipe I applied antique linen distress ink to the image on the white photo paper to colour the children's faces. I then cut away the background from the top left corner and discarded it, and also carefully cut out the children's clothes from the alcohol inked sheet.

All that was left to do was to make a sandwich of (going from the bottom up) coloured background and childrens heads, then antique linen childrens heads and bodies, then coloured clothes.

That sounds so confusing doesn't it? Sorry about that, it was simple to do!

The quote reads "What is so rare as a day in June? Then, if ever, come perfect days. - James Russell Lowell".

July to follow tomorrow!

Friday 14 December 2007

Bind-it-all Calendar - May


Another month, another technique!

The background was created by applying black, burlap and faded jeans distress pads direct to a piece of white card. Copper eyelets were added.

The foreground was created with Moon Shadow Ink - a walnut based ink with an added shimmer powder for colour. The one I used was "Bucket o' Blood Red", so basically it's a watery brown ink with a fine red pearlescent/metallic powder mixed in it (which settles to the bottom when not used).

This is the technique: After shaking well, paint a small piece of white card generously with the ink. Take the stamp you want to use for the design and place it face down on top of the wet card then leave it there overnight to dry. Once it's dry, remove the stamp, and, as if by magic, all the pearlescent powder has moved to fill the parts of the image where the stamp wasn't touching the card! The design was trimmed then stuck onto the background.

June to follow tomorrow :o)

Thursday 13 December 2007

Bind-it-all Calendar - April


Quite a few processes involved in this one, so (deep breath) here goes!

The background was Shabby Shutters distress ink pad applied directly to paper which was then splashed with water drops and dried. It was then stamped with a paint splatter stamp I have, also using Shabby Shutters. Using Pine Needles ink, a large square was then stamped in the centre.

Alcohol inks and blending solution were then applied to a sheet of glossy photo paper. The main image was stamped on top using black Stazon ink, and was stamped again on plain white card. The leaves at the top of the image on the photo paper were coloured using Pine Needles ink pad and a water brush (yes, it works on glossy photo paper!) The image on white card was coloured with distress ink pads and a water brush, then the central focus was cut out and stuck in place on the photo paper background. I tore the edges, then stuck it in place on the water-distressed card background. Phew!

The quote reads "April is a promise May is bound to keep - Hal Borland"

May will follow tomorrow :o)

Wednesday 12 December 2007

Bind-it-all Calendar - March

Time for the next installment of my 2008 Bind-it-all Calendar, and as it's Wednesday, that must mean March!

The image background was cut from a 6x6 Basic Grey paper, distressed by applying black soot Distress ink around the edges with a baby wipe. The paper has a slight sheen to it, so the paperclips and ruler images were stamped using Stazon ink to get a better impression. The words "spring awakening" were stamped in pine needles Distress ink.

The main image was created on glossy photo paper. I tried to use colours that would echo those on the backing paper I'd chosen. Bottle, Denim, Caramel and Terra Cotta alcohol inks were dropped on the paper, and lightened with a few squirts of blending solution. A 2nd sheet was then placed on top and moved around, to create two sheets of identical (or at least very similar) paper. One was filed away for future use, the other was overstamped with the spring themed image in black Stazon. Finally, it was trimmed to size and matted onto black card and stuck to the background.

The quote reads "Our life is March weather, savage and serene in one hour. - Ralph Waldo Emerson".

I hope you like it! :o)

Next installment tomorrow!

Tuesday 11 December 2007

Bind-it-all Calendar - February

Here's the next installment of my Bind-it-all calendar. The trees were embossed in white, silver and black sparkle, and the snowflakes were stamped in white versamagic chalk ink. A few people have asked me where the stamp came from - and, as ever, I can't remember. I do know it was made by a woman in the Vancouver area, but beyond that, I'm clueless! The quote reads "Late February days: and now at last might you have thought that Winter's woe was past - William Morris"

March will follow tomorrow!

Monday 10 December 2007

Bind-it-all Calendar


I decided to use my trusty Bind-it-all to make a calendar as a Christmas gift for a friend. I will post a month on here each day for the next 12 days. The front cover was created on glossy photo paper with alcohol inks, then stamped with Stazon. January was distress inks and white pen. I trawled the web to find a month-related quote for each page. I hope you like it! :o)

February to follow tomorrow!

Sunday 2 December 2007

Making No Sense

As I said in my post yesterday, I felt the need to have a break from making Christmassy things for lists and swaps, and to make something just for myself.

The words in this tag book are taken from the song "They Shoot Horses, Don't They?" by Racing Cars. The song was inspired by the Jane Fonda movie of the same name (for all you trivia buffs out there! :o), and I've wanted to use it in a project for a while now. I took the opportunity to try out some of the stamps I've acquired recently and, of course, to use the Bind-it-all again.

While we're talking about tag books (we were, pay attention, there's a quiz later) I want your opinion on something. Although the pages in this book are made from stationery tags, and I've put eyelets in each one, I opted NOT to put ribbon through them. Anyone that knows me knows that I have so much ribbon it is almost coming out of my ears - I don't seem to be able to stop buying it. Much as I love ribbon, (to an extent that is, quite frankly, embarrassing for a middle-aged man), I've had a bit of a change of heart in the last few days.

Looking back at my projects and those of others online, I've been feeling lately that when I see tag books with ribbons sticking out the side from each page (as all MINE do) the book can sometimes look like it's suffering death by a thousand ribbons. Ribbon is lovely, but so much in one project perhaps seems a bit desperate and could almost be yelling "I'm pretty - love me, darn it, LOVE ME!!" Anyway, that's how I've been feeling lately. Rant over. I'd be interested in hearing your opinions! :o)

Click on the cover image below to see the "flipbook" version that allows you to turn the pages and to see the two-page spreads together, as they were intended to be viewed. If you're unable to view it, I have included a slide show below, so hopefully that will work for you!

Enjoy! :o)


P.S. If it doesn't work for you, your browser may not have the latest version of the bit it needs to see the book. You can get it by following this link:

Click here to update your Flash player

Click on the slide show images below to see a gallery of the pages in this project!

Friday 30 November 2007

Artists Trading Christmas - The Sequel


2 more ATCs for the swap I'm involved in, and that's my 5 finished! :o)

Time for a little break from Christmas for me now I think. The next thing I make will be something I've been saving for when I had no lists or anything waiting to be done..... Watch this space!

Thursday 29 November 2007

Artists Trading Christmas


I have just joined a Christmas themed ATC swap. Each person makes 5 ATCs and receives 5 back. Here are my first two efforts. Nothing that new here, I have definite favourites among my stamps this Christmas, and this Santa and the pine trees are certainly among them.

I haven't made any ATCs in ages, and really enjoyed working at a smaller scale for a change. The backgrounds and images on both were stamped with Distress ink pads, with the graduated sky on the first one being achieved by applying the 2 shades of ink with a wet wipe. White acrylic paint was added for the snow foreground before overstamping the message with fired brick distress ink. The snowflakes were stamped with white Versamagic chalk ink and the gold border above and below Santa's head (which hasn't scanned in very visibly) was stamped with a Brilliance gold teardop pad.

I hope the recipients like them! :o) Thanks for taking a look.

Friday 23 November 2007

Altered box


I'm involved in a swap on the UKS forum where you have to alter something and send it to a swap partner, then receive something else from someone else in return. I've had this small wooden cigar box kicking around for a while, so decided I would alter it for this swap. I used acrylic paint to prime the surface, then decorated it with stamps, dabbers and distress ink pads. The top of the box is triple heat embossed. Inside, I placed a version of my christmas poem, resized to fit the box.

I hope the recipient likes it! Thanks for taking a look :o)

Happy Holly-days!

Sorry for the groan-worthy pun! :oD

This is another 6x3 tag for the swap I'm involoved in. I started out making this as just the background for the tag, but I liked it so much, I left it just as it was!

Tag had a light coating of scattered straw distress ink, applied with a baby wipe. It was then crumpled, and an old paper ink pad rubbed across the raised areas. It was then spritzed with a little water and ironed flat.

Holly and candy cane stamps were applied with pine needles and fired brick distress pads, and coloured with a water brush. The ring around the eyelet is glossy card with alcohol inks applied to it. The holly berries had glossy accents applied to them for a bit of shiny. We like shiny. :o)

Click on the image to see a larger version. Thanks for taking a look! :o)

Friday 9 November 2007

Song for a Lost Love


There are actually 3 of these floating around the world in various places! One has a home in Canada, the other two at opposite ends of the UK. Not a new piece of work, but in the name of completeness, I thought I'd post it here for those of you that are recent discoverers of me and my paper world! :o)

I had hoped to present this as another of my interactive flipbooks, but unfortunately it's so long and narrow that as a double page spread, it just isn't big enough to read any of the text, so here it is as a series of still images.

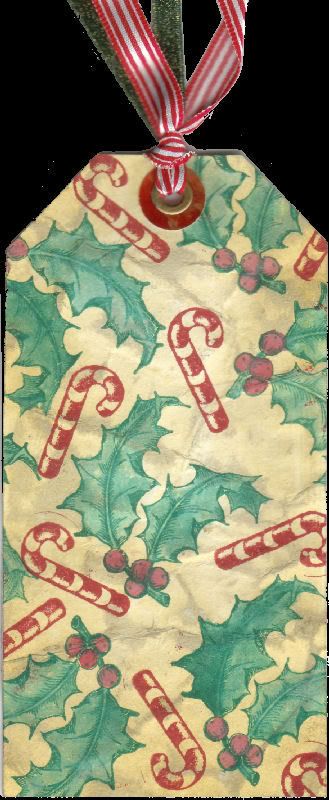
A book made from regular office type tags, bound together using brass hinges to turn each page, and chipboard covers. I cut craft paper down into A4 sheets and printed the text from the computer, then covered each tag with it and stamped, distressed and decorated each page. Words from "Love Song for a Vampire" by Annie Lennox.

Click on the slide show or on any image to enlarge it.


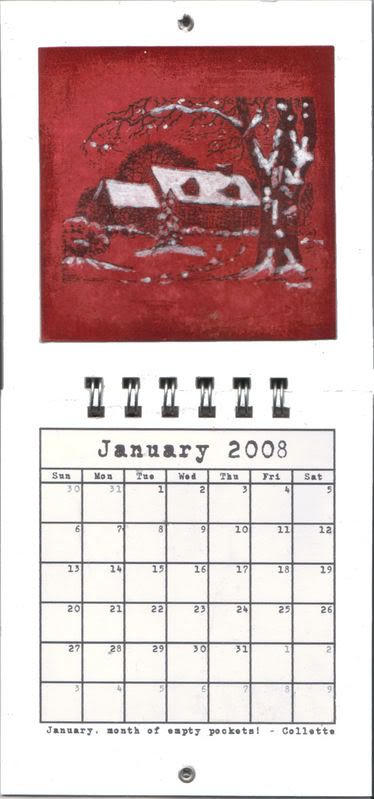
Page 1 - "Come into these arms again and lay your body down. The rythm of this trembling heart is beating like a drum".

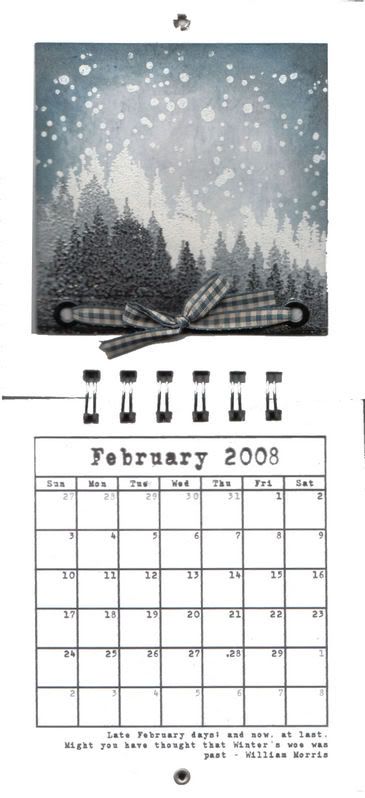
Page 2 - "It beats for you, it bleeds for you, it knows not how it sounds. For it is the drum of drums, it is the song of songs".

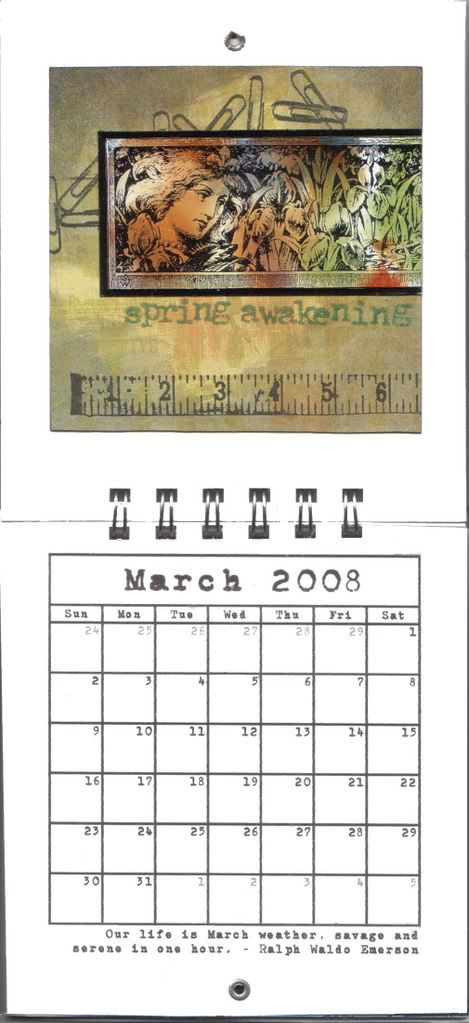
Page 3 - "Once I had the rarest rose that ever deigned to bloom. Cruel winter chilled the bud, and stole my flower too soon".

Page 4 - "Oh loneliness - oh hopelessness, to search the ends of time. For there is in all the world, no greater love than mine".

Page 5 - "Let me be the only one to keep you from the cold, now the floor of heaven's lain with stars of brightest gold".

Page 6 - "They shine for you, they shine for you, they burn for all to see. Come into these arms again and set this spirit free".

Wednesday 7 November 2007

Once Upon a December Night

I had the idea for this book back in September, and I wanted it to be a take on "Twas the Night Before Christmas", but with a more adult feel to it. I think it's the biggest thing I've ever made, 13 verses to the poem, and 32 pages in total to decorate.

The poem itself took quite a while to get right, but that was nothing to the task of trying to collect appropriate stamps to illustrate it. I searched for weeks, but was unable to find stamps of the right style to illustrate some of the verses. Eventually I designed a stamp of my own for one of the pages (it's for the verse about chimneys, you'll know it when you see it), and I used acetate/photograph/alcohol ink techniques for the 4 or 5 remaining verses.

Things I am particularly proud of? The book plate on the front which was plain chrome when I started. I painted it with brown acrylic paint and then attacked it with sandpaper - I think it looks great!

As there are 32 pages, the flipbook is quite large, so give it a few seconds to download! Click on the image below to try the interactive flipbook.


P.S. If it doesn't work for you, your browser may not have the latest version of the bit it needs to see the book. You can get it by following this link:

Click here to update your Flash player

Click on the slide show images below to see a gallery of the pages in this project!


Monday 5 November 2007

An extravaganza of embossing!


4x4 fat book page for a christmas rubber stamped swap that I'm involved with.

Everything apart from the background on the front of this page has been embossed. The background was faded jeans and black soot distress inks applied with a wet wipe.

3 rows of pine trees were embossed, in white, silver and black sparkle. The snowflakes are a paint splatter stamp I bought in Canada, embossed in white.

Back is faded jeans distress ink with my avatar stamp and a tapestry stamp.

Click on the image for a larger view.

Santa Tag

Another 6x3 tag for the tag swap I'm involved in. PaperArtsy holly border was stamped and embossed in gold. Fired brick distress pad applied to the whole tag, black soot distress pad applied to the holly border with a wet wipe. Eyelet surround is black card with a crackle background stamped and embossed in gold, then punched to shape. Santa is a rubbadubbadoo stamp, applied as low-level decoupage, which is to say it was separated into layers, but no 3d foam or silicone glue was used. This still gives a 3d effect, but it's much more subtle. Back of tag was stamped with my own avatar and "handmade" stamps and a tapestry snowflake stamp, in fired brick and aged mahogany.

Oh, and I almost forgot, there's a tiny amount of stickles glitter on his hat and beard, just for a bit of sparkle :o)

Click on the image to get a larger view.

Sunday 4 November 2007

Blue Christmas


A christmas card based around one of my fat page designs. An acrylic message stamp and a tapestry stamp were used for the text on the card.

Click on the card for a larger view.

Thursday 1 November 2007

Words Tag


Another of my own stamp designs, the original design shown on the left. I love this stamp, it makes such a crisp, clean impression, and is so versatile - the words can be kept in one block or separated to make 6 word stamps.

The tag was stamped and embossed with black sparkle embossing powder and the words were then coloured using Sakura glaze pens.

Designed by yours truly!


I've finally gotten around to having a sheet of my own stamp designs made. The image on the left shows the original stamp design, and on the right is an ATC made with the completed stamp.

This stamp is based around an image of my grandmother as a young girl, I hope she likes it!

Wednesday 31 October 2007

Christmas Tag

6" x 3" tag made for a swap that I'm taking part in. The main criteria is that it should use rubber stamping. I will put ribbons through the top, but it was easier to scan in without them! Fired brick and black soot distress pads, acrylic clear border stamps, clear santa stamp and pine trees stamp were used.

Click on the tag for a larger view.

Monday 29 October 2007

Halloween colours birthday card


I thought I'd break with my usual style and try a bit of digi-card making. I used papers and accents from shabby princess and 2 peas in a bucket for this, and must say I really enjoyed making it. And my hands were clean at the end of it!! :oD

Click on the picture if you want to see a larger view.

Sunday 28 October 2007

Alice Revisited

By special request, I have created a flipbook of Alice Revisited, a project I did last year. I made 4 or 5 copies of this, all of which have now passed into other hands, so special thanks to my friend Andrea for scanning this for me!

Click on the picture below to open it, then use your mouse to turn the pages by clicking and dragging!


P.S. If it doesn't work for you, your browser may not have the latest version of the bit it needs to see the book. You can get it by following this link:

Click here to update your Flash player

Click on the slide show images below to see a gallery of the pages in this project!


Friday 26 October 2007

The Palest Ink

This Bind-it-all project was inspired by Chinese proverbs. I used alcohol inks on a few pages as there is apparently a threat of them no longer being sold in Europe (I hope that's not true!)

Click on the still image below to see the flipbook version. For those of you that liked the white arrows I put on the last flipbook I made, I apologise. Due to a technical hitch I was unable to add them to this book!

Click on the picture below to open it, then use your mouse to turn the pages by clicking and dragging!


P.S. If it doesn't work for you, your browser may not have the latest version of the bit it needs to see the book. You can get it by following this link:

Click here to update your Flash player

Click on the slide show images below to see a gallery of the pages in this project!

Related Posts with Thumbnails